A friendly HTML tutorial about connecting web pages to each other
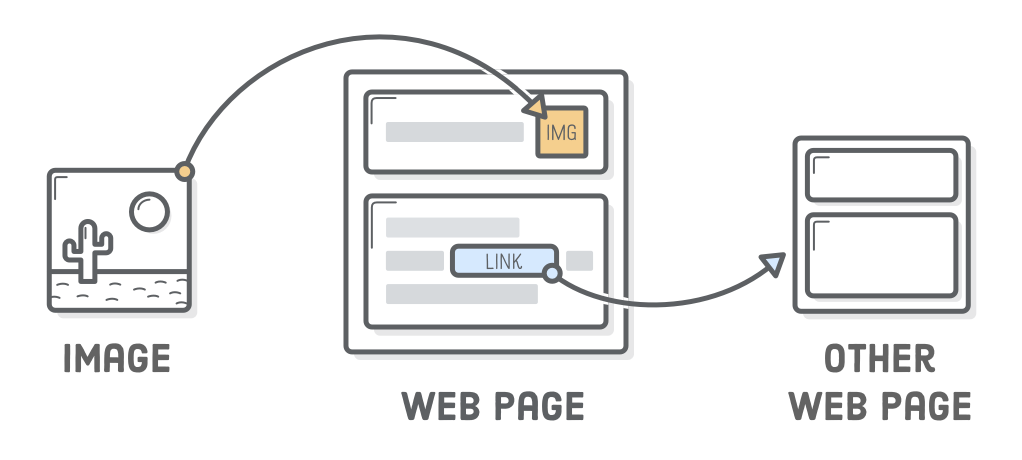
The previous chapter covered some very important HTML elements, but we were only dealing with a single web page. Links and images are fundamentally different from those elements in that they deal with external resources. Links point the user to a different HTML document, and images pull another resource into the page.
To use links and images, we’ll also need to learn about another component of the HTML syntax: attributes. Attributes will open up a whole new world of possibilities for our web pages.
In this chapter, we’ll create a simple website composed of several HTML documents and image files. It may be entitled Links and Images, but the central theme of this chapter is actually around file and folder organization. As we start working with multiple files, we’ll discover the importance of being an organized web developer.
Setup
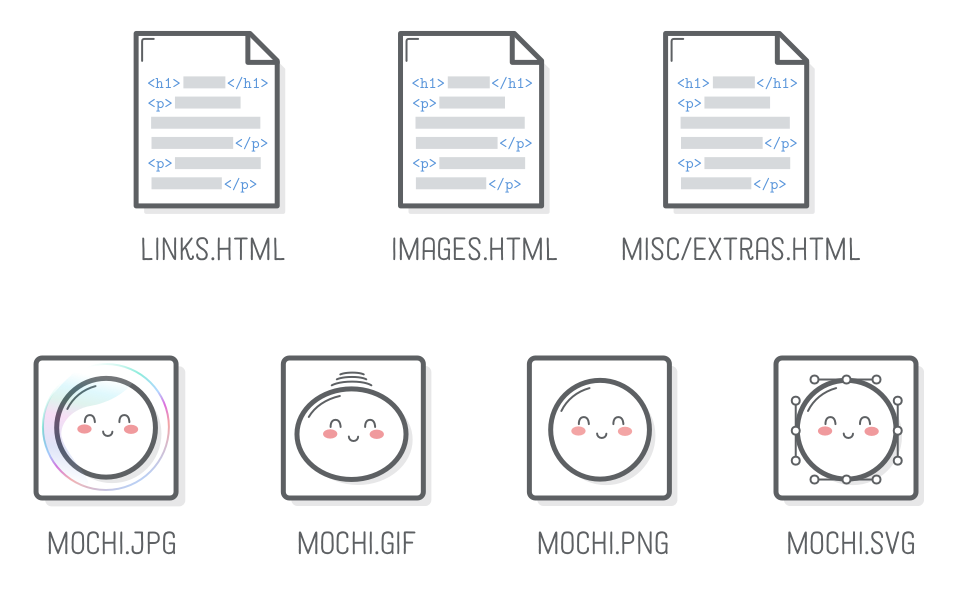
This chapter is all about linking web pages together, so we’ll need to create some new HTML files before we code anything up. We’ll be working with three separate web pages this chapter, along with a few image files of various formats:
To get started, create a new folder called links-and-images to store all our files. You should be able to do this in Atom using the same process we followed in the Introduction chapter.
Links Page
Next, add a new file to that folder called links.html and insert the following HTML template. This should be familiar to you from the previous chapter.
Note that you can create a new folder in Atom by right-clicking the file browser pane and selecting New Folder in the contextual menu. Life is better when you never need to leave your text editor.
Image Downloads
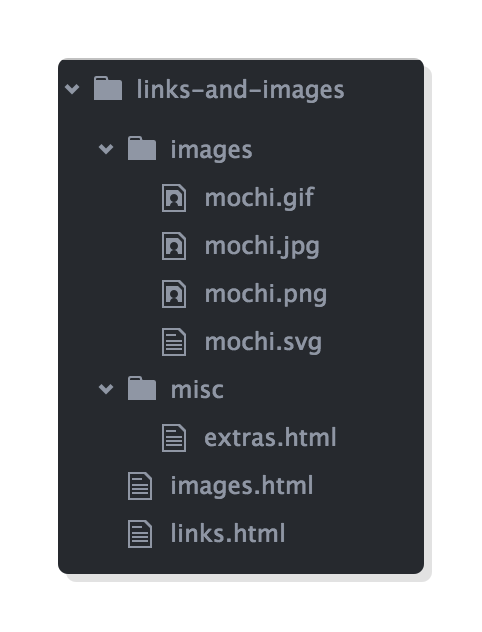
We’ll be embedding images in our images.html file, so be sure to download these example mochi images, too. Unzip them in your links-and-images folder, keeping the parent images folder from the ZIP file. Your project should now look like this:
Anchors
Links are created with the <a> element, which stands for “anchor”. It works just like all the elements in the previous chapter: when you wrap some text in <a> tags, it alters the meaning of that content. Let’s take a look by adding the following paragraph to the <body> element of links.html:
<p>This example is about links and <a>images</a>.</p>
If you load the page in a web browser, you’ll notice that the <a> element doesn’t look like a link at all. Yes, unfortunately, the <a> element on its own doesn’t do much of anything.
Links
In the same way that an element adds meaning to the content it contains, an HTML “attribute” adds meaning to the element it’s attached to.
Different elements allow different attributes, and you can refer to MDN for details about which elements accept which attributes. Right now, we’re concerned with the href attribute because it determines where the user goes when they click an <a> element. Update your link to match the following:
<p>This example is about links and <ahref='images.html'>images</a>.</p>
Notice how attributes live inside the opening tag. The attribute name comes first, then an equal sign, then the “value” of the attribute in either single or double quotation marks. This syntax distinguishes attributes from content (which goes between the tags).
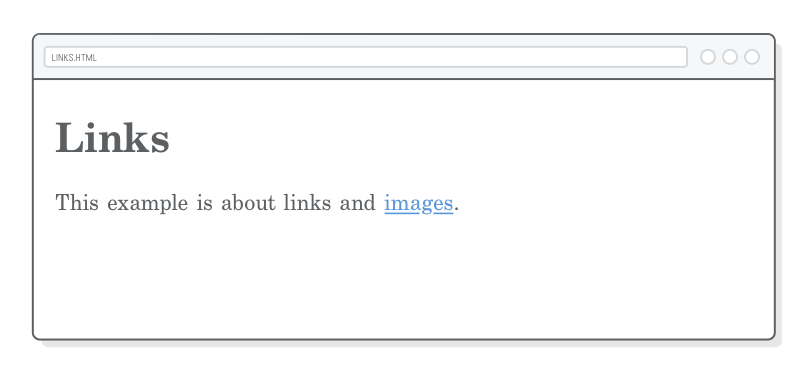
The extra bit of information provided by the href attribute tells the browser that this <a> element is in fact a link, and it should render the content in its default blue text:
Absolute, Relative, and Root-Relative Links
Now that we’re working with links, we need to understand how a website is structured. For our purposes, a website is just a collection of HTML files organized into folders. To refer to those files from inside of another file, the Internet uses “uniform resource locators” (URLs). Depending on what you’re referring to, URLs can take different forms. The three types of URLs we’ll be dealing with are highlighted below:
Absolute, relative, and root-relative links refer to the value of the href attribute. The next few sections will explain how and when to use each of them. But first, let’s add the following content to our links.html file:
<p>This particular page is about links! There are three kinds of links:</p><ul><!-- Add <li> elements here --></ul>
Absolute Links
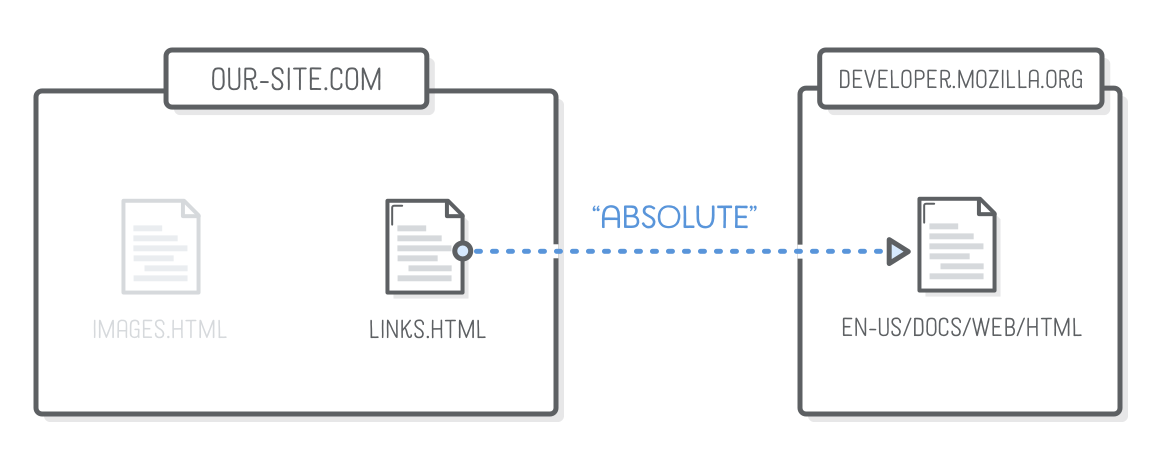
“Absolute” links are the most detailed way you can refer to a web resource. They start with the “scheme” (typically http:// or https://), followed by the domain name of the website, then the path of the target web page.
For example, try creating a link to the Mozilla Developer Network’s HTML element reference:
<li>Absolute links, like to
<ahref='https://developer.mozilla.org/en-US/docs/Web/HTML'>Mozilla
Developer Network</a>, which is a very good resource for web
developers.</li>
It’s possible to use absolute links to refer to pages in your own website, but hard-coding your domain name everywhere can make for some tricky situations. It’s usually a better idea to reserve absolute links only for directing users to a different website.
Relative Links
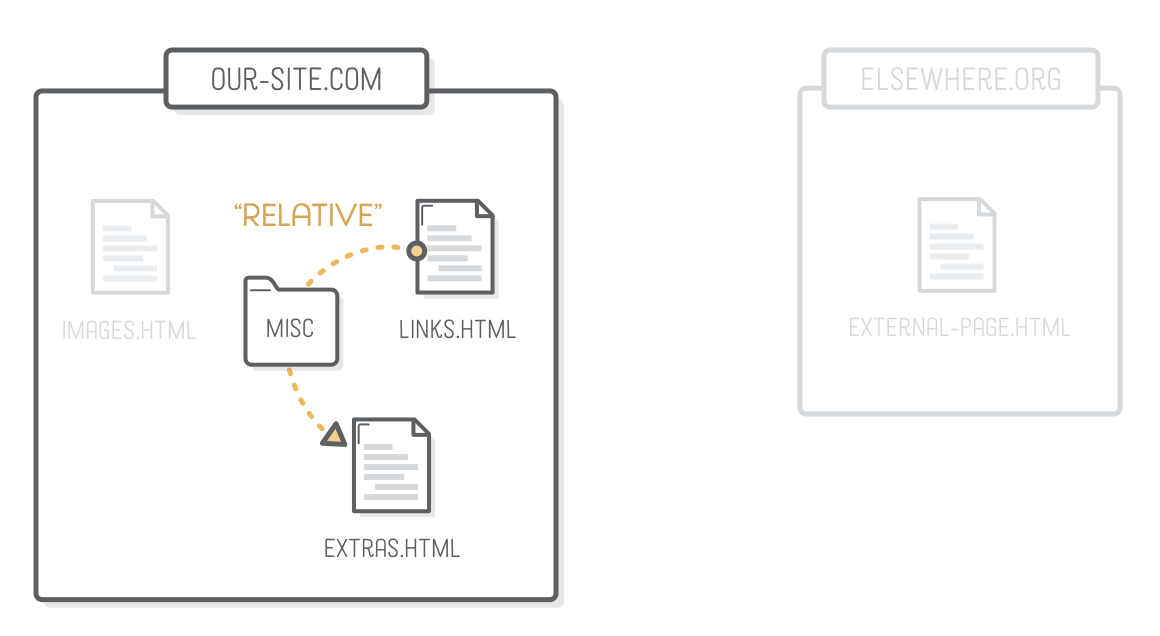
“Relative” links point to another file in your website from the vantage point of the file you’re editing. It’s implied that the scheme and domain name are the same as the current page, so the only thing you need to supply is the path.
Here’s how we can link to our extras.html file from inside of links.html:
<li>Relative links, like to our <ahref='misc/extras.html'>extras
page</a>.</li>
In this case, the href attribute represents the file path to extras.html from the links.html file. Since extras.html isn’t in the same folder as links.html, we need to include the misc folder in the URL.
Each folder and file in a path is separated by a forward slash (/). So, if we were trying to get to a file that was two folders deep, we’d need a URL like this:
misc/other-folder/extras.html
Parent Folders
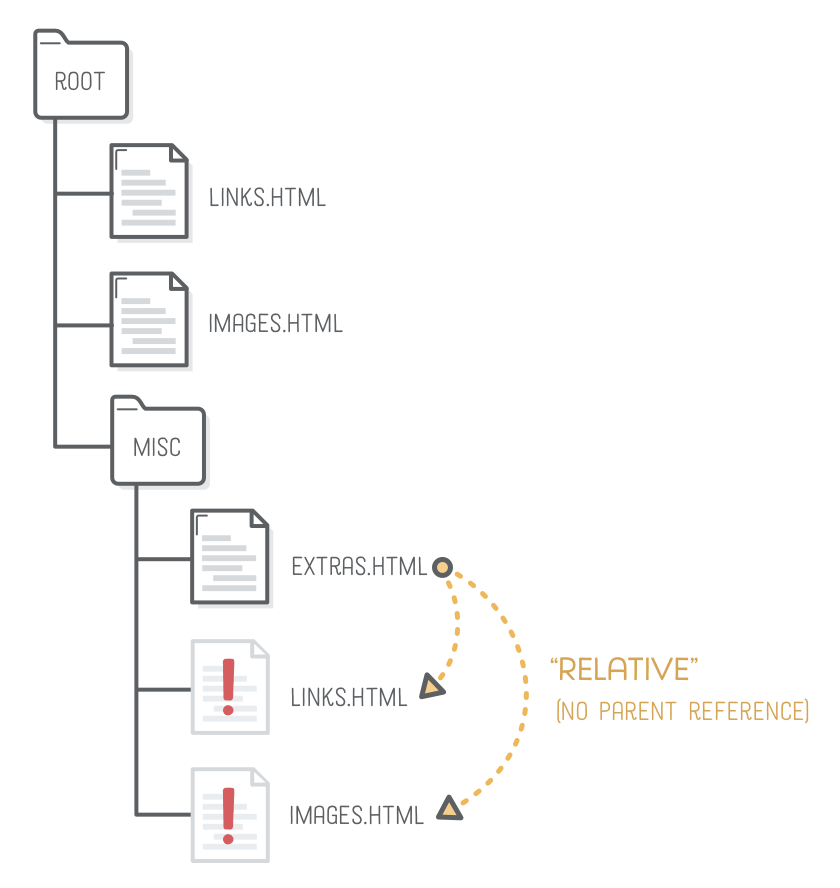
That works for referring to files that are in the same folder or a deeper folder. What about linking to pages that are in a directory above the current file? Let’s try creating relative links to links.html and images.html from within our extras.html file. Add this to extras.html:
<p>This page is about miscellaneous HTML things, but you may
also be interested in <ahref='links.html'>links</a> or
<ahref='images.html'>images</a>.</p>
When you click either of those links in a web browser, it will complain that the page doesn’t exist. Examining the address bar, you’ll discover that the browser is trying to load misc/links.html and misc/images.html—it’s looking in the wrong folder! That’s because our links are relative to the location of extras.html, which lives in the misc folder.
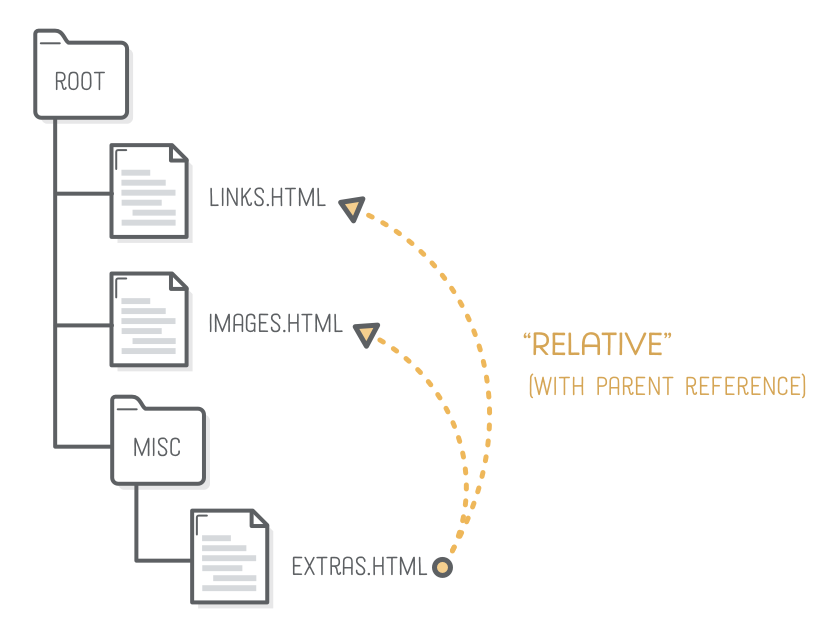
To fix this, we need the .. syntax. Two consecutive dots in a file path represent a pointer to the parent directory:
<p>This page is about miscellaneous HTML things, but you may also be
interested in <ahref='../links.html'>links</a> or <ahref='../images.html'>images</a>.</p>
This is like saying, “I know extras.html is in the misc folder. Go up a folder and look for links.html and images.html in there.”
To navigate up through multiple directories, use multiple .. references, like so:
../../elsewhere.html
Relative links are nice because they let you move around entire folders without having to update all the href’s on your <a> elements, but they can get a little confusing when all your links start with a bunch of dots. They’re best for referring to resources in the same folder or in a standalone section of your website.
For example, all the images in HTML & CSS Is Hard are loaded with relative URLs (we’ll learn how to do images a moment). This allows us to rename any of our chapter slugs without having to update all our image paths.
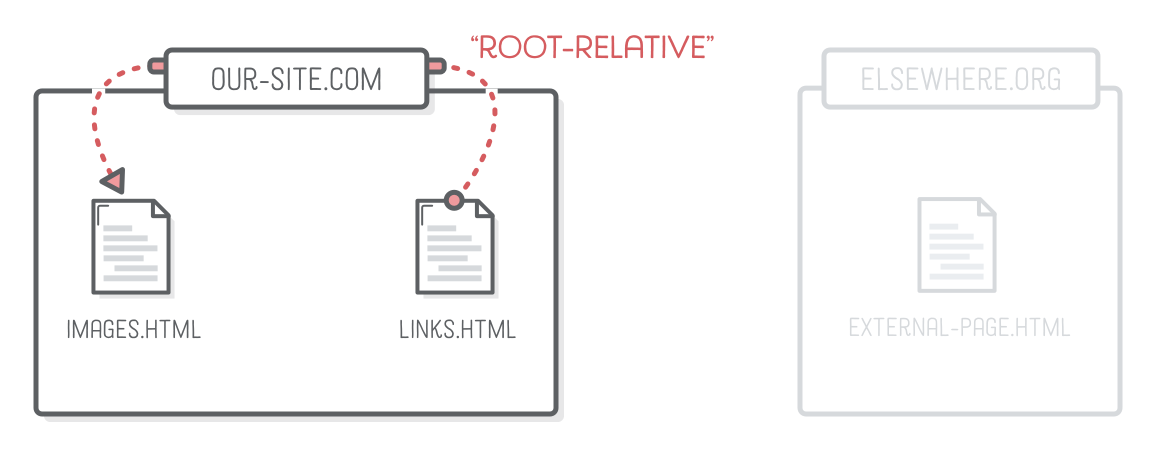
Root-Relative Links
“Root-relative” links are similar to the previous section, but instead of being relative to the current page, they’re relative to the “root” of the entire website. For instance, if your website is hosted on our-site.com, all root-relative URLs will be relative to our-site.com.
Unfortunately, there is one caveat to our discussion of root-relative links: this entire tutorial uses local HTML files instead of a website hosted on a web server. This means we won’t be able to experiment with root-relative links. But, if we did have a real server, the link to our home page would look like this:
<!-- This won't work for our local HTML files --><li>Root-relative links, like to the <ahref='/'>home page</a> of our website,
but those aren't useful to us right now.</li>
The only difference between a root-relative link and a relative one is that the former starts with a forward slash. That initial forward slash represents the root of your site. You can add more folders and files to the path after that initial slash, just like relative links. The following path will work correctly no matter where the current page is located (even in misc/extras.html):
/images.html
Root-relative links are some of the most useful kinds of links. They’re explicit enough to avoid the potential confusion of relative links, but they’re not overly explicit like absolute links. You’ll see a lot of them throughout your web development career, especially in larger websites where it’s hard to keep track of relative references.
Link Targets
Attributes alter the meaning of HTML elements, and sometimes you need to modify more than one aspect of an element. For example, <a> elements also accept a target attribute that defines where to display the page when the user clicks the link. By default, most browsers replace the current page with the new one. We can use the target attribute to ask the browser to open a link in a new window/tab.
Try changing our absolute link in links.html to match the following. Notice how the second attribute looks just like the first, but they’re separated from each other by a space (or a newline):
<li>Absolute links, like to
<ahref='https://developer.mozilla.org/en-US/docs/Web/HTML'target='_blank'>Mozilla Developer Network</a>, which is a very good
resource for web developers.</li>
The target attribute has a few pre-defined values that carry special meaning for web browsers, but the most common one is _blank, which specifies a new tab or window. You can read about the rest on MDN.
Naming Conventions
You’ll notice that none of our files or folders have spaces in their names. That’s on purpose. Spaces in URLs require special handling and should be avoided at all costs. To see what we’re talking about, try creating a new file in our links-and-images project called spaces are bad.html. Add a little bit of text to it, then open it in Google Chrome or Safari (Firefox cheats and preserves the spaces).
links-and-images/spaces%20are%20bad.html
In the address bar, you’ll see that all our spaces have been replaced with %20, as shown above. Spaces aren’t allowed in URLs, and that’s the special encoding used to represent them. Instead of a space, you should always use a hyphen, as we’ve been doing throughout this tutorial. It’s also a good idea to use all lowercase characters for consistency.
Notice how there’s a direct connection between our file/folder names and the URL for the web page they represent. The names of our folders and files determine the slugs for our web pages. They’re visible to the user, which means you should put in as much effort into naming your files as you put into creating the content they contain.
These naming conventions apply to all of the files in your site—not just HTML files. CSS files, JavaScript files, and images should avoid spaces and have consistent capitalization, too.
Images
Unlike all the HTML elements we’ve encountered so far, image content is defined outside of the web page that renders it. Fortunately for us, we already have a way to refer to external resources from within an HTML document: absolute, relative, and root-relative URLs.
Images are included in web pages with the <img/> tag and its src attribute, which points to the image file you want to display. Notice how it’s an empty element like <br/> and <hr/> from the previous chapter. (Don’t add this to our project just yet. We’ll deal with concrete examples in the next section.)
<imgsrc='some-photo.jpg'/>
Retina displays and mobile devices make image handling a little bit more complicated than a plain old <img/> tag. We’ll leave these complexities for the Responsive Images chapter of this tutorial. Also be sure to check out the <figure> and <figcaption> element in the Semantic HTML chapter.
For now, let’s focus on the many image formats floating around the Internet.
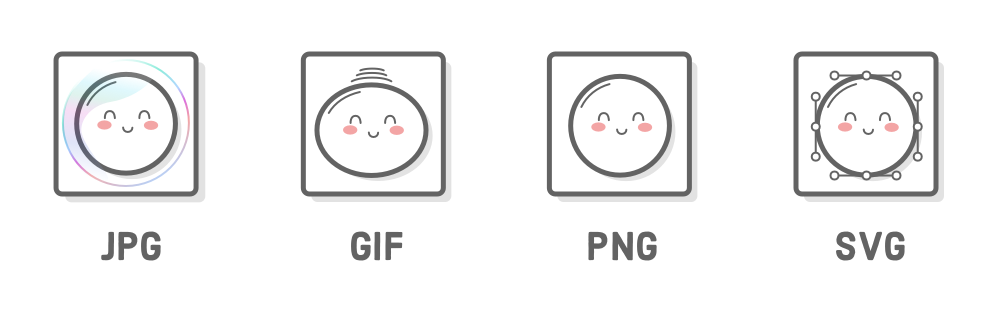
Image Formats
There’s four main image formats in use on the web, and they were all designed to do different things. Understanding their intended purpose goes a long way towards improving the quality of your web pages.
The next few sections will walk through ideal use cases for each of these image formats. Make sure you’ve unzipped these mochi images into your links-and-images project before moving on.
JPG Images
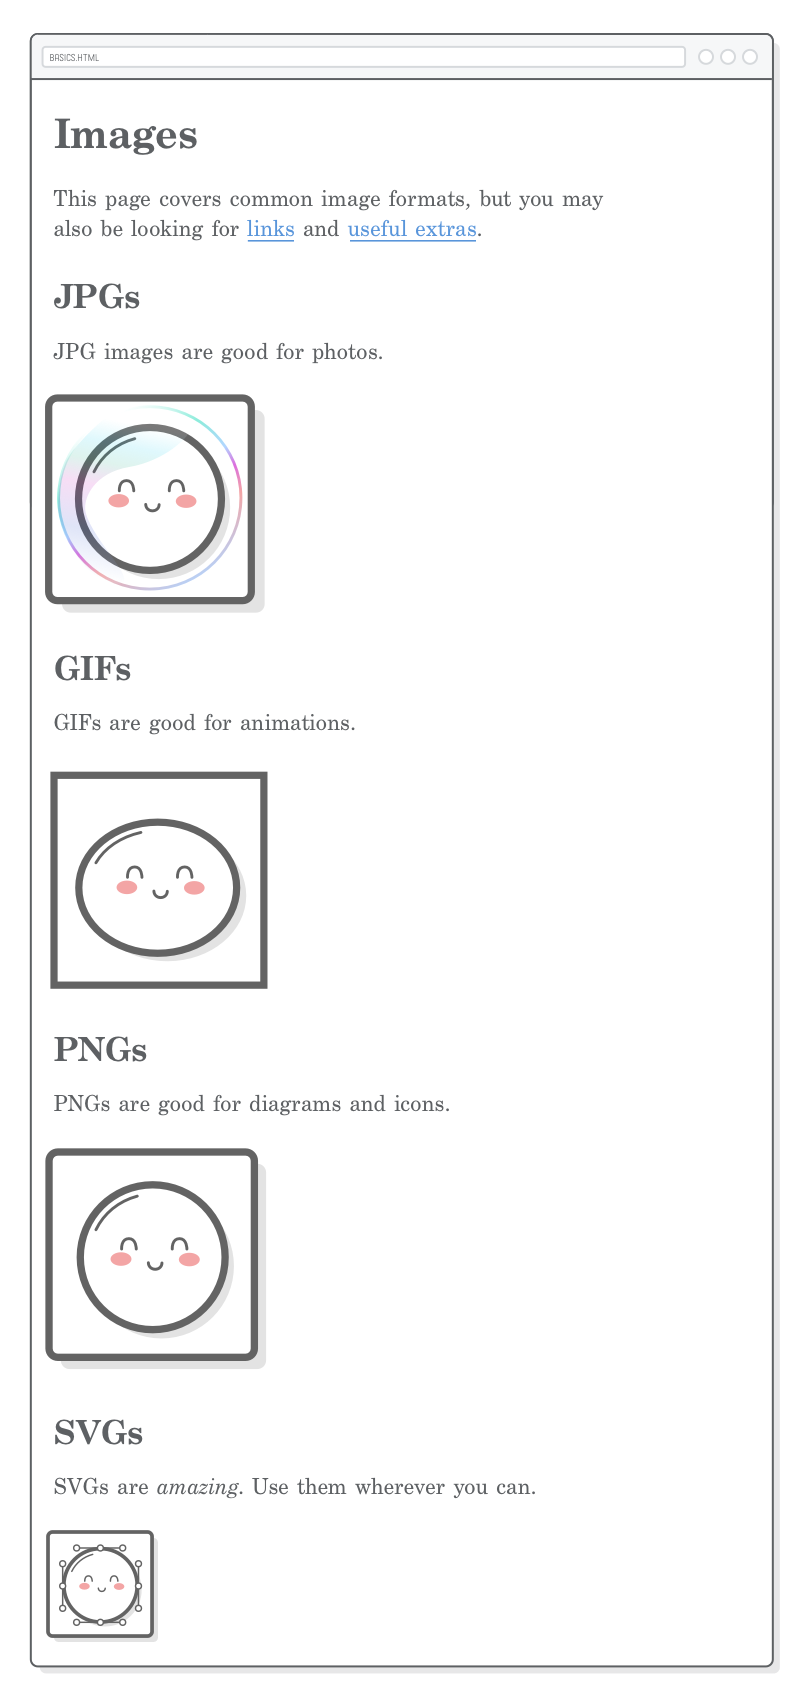
JPG images are designed for handling large color palettes without exorbitantly increasing file size. This makes them great for photos and images with lots of gradients in them. On the other hand, JPGs don’t allow for transparent pixels, which you can see in the white edges of the image below if you look real close:
Embed this mochi.jpg image in our images.html page with the following snippet (this also includes a bit of navigation to our other pages):
<p>This page covers common image formats, but you may also be looking for <ahref='links.html'>links</a> and <ahref='misc/extras.html'>useful
extras</a>.</p><h2>JPGs</h2><p>JPG images are good for photos.</p><imgsrc='images/mochi.jpg'/>
GIF Images
GIFs are the go-to option for simple animations, but the trade off is that they’re somewhat limited in terms of color palette—never use them for photos. Transparent pixels are a binary option for GIFs, meaning you can’t have semi-opaque pixels. This can make it difficult to get high levels of detail on a transparent background. For this reason, it’s usually better to use PNG images if you don’t need animation.
You can add this little guy to our images.html file with the following:
<h2>GIFs</h2><p>GIFs are good for animations.</p><imgsrc='images/mochi.gif'/>
PNG Images
PNGs are great for anything that’s not a photo or animated. For photos, a PNG file of the same quality (as perceived the human eye) would generally be bigger than an equivalent JPG file. However, they do deal with opacity just fine, and they don’t have color palette limitations. This makes them an excellent fit for icons, technical diagrams, logos, etc.
Let’s add this PNG image to our example project as well:
<h2>PNGs</h2><p>PNGs are good for diagrams and icons.</p><imgsrc='images/mochi.png'/>
SVG Images
Unlike the pixel-based image formats above, SVG is a vector-based graphics format, meaning it can scale up or down to any dimension without loss of quality. This property makes SVG images a wonderful tool for responsive design. They’re good for pretty much all the same use cases as PNGs, and you should use them whenever you can.
These 300×300 pixel images were originally 100×100 pixels, but scaling them up clearly shows the difference between them. Notice the crisp, clean lines on the left SVG image, while the PNG image on the right is now very pixelated.
Despite being a vector format, SVGs can be used exactly like their raster counterparts. Go ahead and add the mochi.svg to our images.html page:
<h2>SVGs</h2><p>SVGs are <em>amazing</em>. Use them wherever you can.</p><imgsrc='images/mochi.svg'/>
There is one potential issue with SVGs: for them to display consistently across browsers, you need to convert any text fields to outlines using your image editor (e.g., Abode Illustrator or Sketch). If your images contain a lot of text (like the fancy screenshots in this tutorial), this can have a big impact on file size. For this reason, InternetingIsHard.com uses PNGs instead of SVGs, even though SVGs are so awesome.
Image Dimensions
By default, the <img/> element uses the inherit dimensions of its image file. Our JPG, GIF, and PNG images are actually 150×150 pixels, while our SVG mochi is only 75×75 pixels.
As we’ll discuss further in Responsive Images, pixel-based image formats need to be twice as big as you want them to appear on retina displays. To get our pixel-based images down to the intended size (75×75), we can use the <img/> element’s width attribute. In images.html, update all of our pixel-based images to match the following:
<!-- In JPGs section --><imgsrc='images/mochi.jpg'width='75'/><!-- In GIFs section --><imgsrc='images/mochi.gif'width='75'/><!-- In PNGs section --><imgsrc='images/mochi.png'width='75'/>
The width attribute sets an explicit dimension for the image. There’s a corresponding height attribute, as well. Setting only one of them will cause the image to scale proportionally, while defining both will stretch the image. Dimension values are specified in pixels, and you should never include a unit (e.g., width='75px' would be incorrect).
The width and height attributes can be useful, but it’s usually better to set image dimensions with CSS so you can alter them with media queries. We’ll discuss this in more detail once we get to responsive design.
Text Alternatives
Adding alt attributes to your <img/> elements is a best practice. It defines a “text alternative” to the image being displayed. This has an impact on both search engines and users with text-only browsers (e.g., people that use text-to-speech software due to a vision impairment).
Update all our images to include descriptive alt attributes:
<!-- In JPGs section --><imgsrc='images/mochi.jpg'width='75'alt='A mochi ball in a bubble'/><!-- In GIFs section --><imgsrc='images/mochi.gif'width='75'alt='A dancing mochi ball'/><!-- In PNGs section --><imgsrc='images/mochi.png'width='75'alt='A mochi ball'/><!-- In SVGs section --><imgsrc='images/mochi.svg'alt='A mochi ball with Bézier handles'/>
For more examples of how to use the alt attribute, please refer to the ridiculously detailed official specification.
More HTML Attributes
Now that we’re (hopefully) more than comfortable with the HTML attribute syntax, we can add a couple of finishing touches to our HTML boilerplate code. Every web page you create should define the language it’s written in and its character set.
Document Language
A web page’s default language is defined by the lang attribute on the top-level <html> element. Our document is in English, so we’ll use the en country code as the attribute value (do this for all of the pages we created):
<htmllang='en'>
If you’re not sure what the country code for your language is, you can look it up here under the Subtag field.
Character Sets
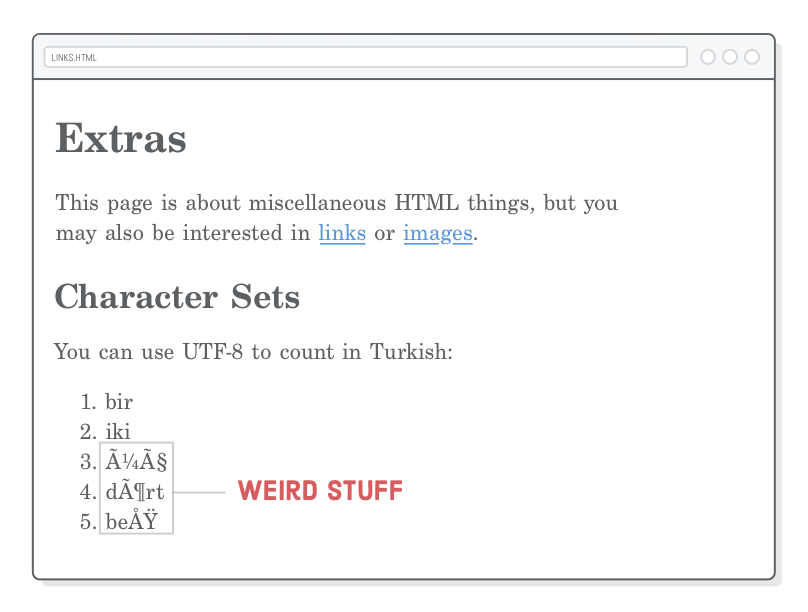
A “character set” is kind of like a digital alphabet for your browser. It’s different from the language of your document in that it only affects how the letters themselves are rendered, not the language of the content. Let’s copy and paste some international characters into our misc/extras.html web page and see what happens.
<h2>Character Sets</h2><p>You can use UTF-8 to count in Turkish:</p><ol><li>bir</li><li>iki</li><li>üç</li><li>dört</li><li>beş</li></ol>
When you view this in a browser, you’ll see some weird stuff where the ü, ç, ö, and ş characters should be:
That’s because the default character set for most browsers doesn’t accommodate these “special” characters. To fix this, specify a UTF-8 character encoding by adding a <meta> element with a charset attribute to the <head> of our misc/extras.html file:
<metacharset='UTF-8'/>
The special characters should now render correctly. These days, UTF-8 is sort of like a universal alphabet for the Internet. Every web page you create should have this line in its <head>.
HTML Entities
Ok, so this last section doesn’t actually have anything to do with links or images, but we do need to discuss one more thing before switching gears into CSS. An “HTML entity” is a special character that can’t be represented as plain text in an HTML document. This typically either means it’s a reserved character in HTML or you don’t have a key on your keyboard for it.
Reserved Characters
The <, >, and & characters are called “reserved characters” because they aren’t allowed to be inserted into an HTML document without being encoded. This is because they mean something in the HTML syntax: < begins a new tag, > ends a tag, and, as we’re about to learn, & sets off an HTML entity.
In misc/extras.html, add the following:
<h2>HTML Entities</h2><p>There are three reserved characters in HTML: < > and &. You
should always use HTML entities for these three characters.</p>
Entities always begin with an ampersand (&) and end with a semicolon (;). In between, you put a special code that your browser will interpret as a symbol. In this case, it interprets lt, gt, and amp as less-than, greater-than, and ampersand symbols, respectively.
There’s a crap-ton of HTML entities. We’ll leave you to explore most of them on your own.
Quotes
Curly quotes are by no means necessary, but if you care about typography they’ll be some of the most common HTML entities you’ll use. There’s four different kinds of curly quotes (opening and closing single and double quotes):
“
”
‘
’
You can use them in place of ' and " straight quotes, like so:
<p>If you’re into “web typography,” you’ll also find
yourself using curly quotes quite a bit.</p>
Unlike straight quotes, these curly quote entities should hug the text.
UTF-8 and HTML Entities
In the olden days of the web, HTML files weren’t allowed to have special characters in them, making entities much more useful. But, since we’re now using a UTF-8 character set, we should be able to insert any character directly into the HTML document. This makes entities primarily useful as reserved characters or for convenience when authoring straight HTML.
Summary
A website is basically just a bunch of HTML, image, and (as we’ll learn about shortly) CSS files linked together. You should start thinking of a website as a beautiful way for users to navigate the folders and files we create as part of the web development process. With that perspective, it should be clear than maintaining a well-organized file system is a critical aspect of creating a website.
We also learned about a few important attributes (lang and charset) that give us the basic template you should use as the beginning of every web page you ever create:
<!DOCTYPE html><htmllang='en'><head><metacharset='UTF-8'/><title>Some Web Page</title></head><body><h1>Some Web Page</h1><!-- Rest of the page content --></body></html>
However, we’re still missing one really big piece: CSS. In the next chapter, we’ll discover more HTML elements and attributes that will let us attach CSS styles to our entire website. The ability to work with multiple files and link them to each other in intelligent ways will become even more important than it was in this chapter.