A friendly tutorial for developing meaningful web pages
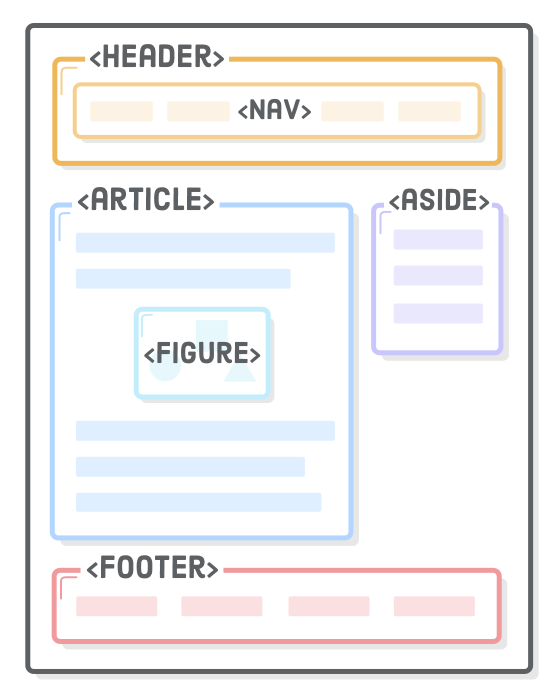
“Semantic HTML” refers to the idea that all your HTML markup should convey the underlying meaning of your content—not its appearance. We’ve already been writing semantic HTML (e.g., using <strong> instead of <b>), but there’s a whole set of elements designed for the sole purpose of adding more meaning to the overall layout of a web page. They’re called “sectioning elements”, and they look something like this:
Using these as an alternative to <div> elements is an important aspect of modern web development because it makes it easier for search engines, screen readers, and other machines to identify the different parts of your website. It also helps you as a developer keep your site organized, which, in turn, makes it easier to maintain.
We’re going back to straight HTML this chapter—no box model, flexbox, or positioning schemes. However, that’s not to say you can’t apply all of the CSS rules from previous chapters to these new elements. Think of sectioning elements as <div>’s, but with meaning.
Setup
Our example for this chapter will be a simple unstyled HTML document. Create a new Atom project called semantic-html with a new file in it called article.html. Add the following:
<!DOCTYPE html><htmllang='en'><head><metacharset='UTF-8'/><title>Semantic HTML</title></head><body><h1>Interneting Is Easy!</h1><ul><li><ahref='#'>Home</a></li><li><ahref='#'>About</a></li><li><ahref='#'>Blog</a></li><li><ahref='#'>Sign Up</a></li></ul></body></html>
That <h1> and <ul> are presumably the top-level banner for our website—not the main content of the web page. We’ve never had to make this distinction before, but that’s what this whole chapter is about.
The Document Outline
Every HTML document has an “outline,” which is how search engines and screen readers view the hierarchy of the content on the page. The <h1> through <h6>heading elements all contribute to a page’s document outline. Let’s check it out by adding a dummy blog post to our article.html file:
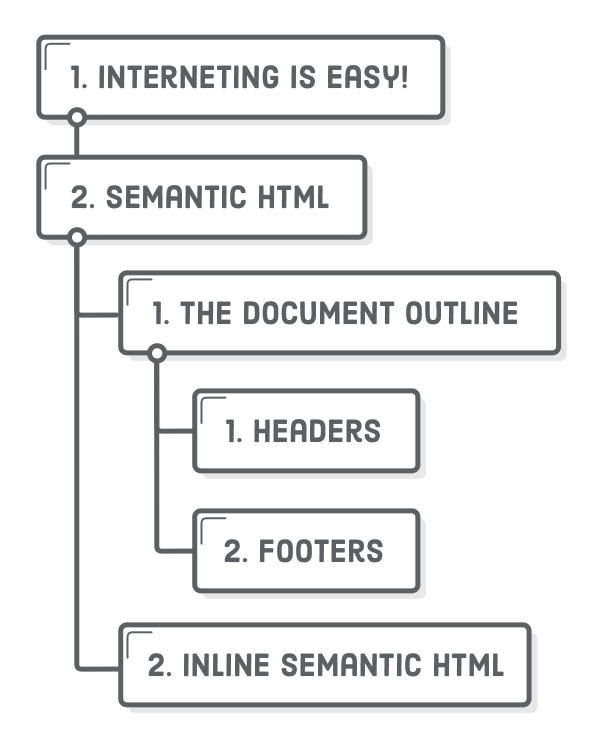
The HTML5 Outliner is a convenient tool for inspecting the document outline of a page. Go ahead and paste the entirety of article.html into the text field at the bottom. You should see the outline for our example, which currently has the following structure. It’s a little reminiscent of the research paper outlines you learned to make in elementary school.
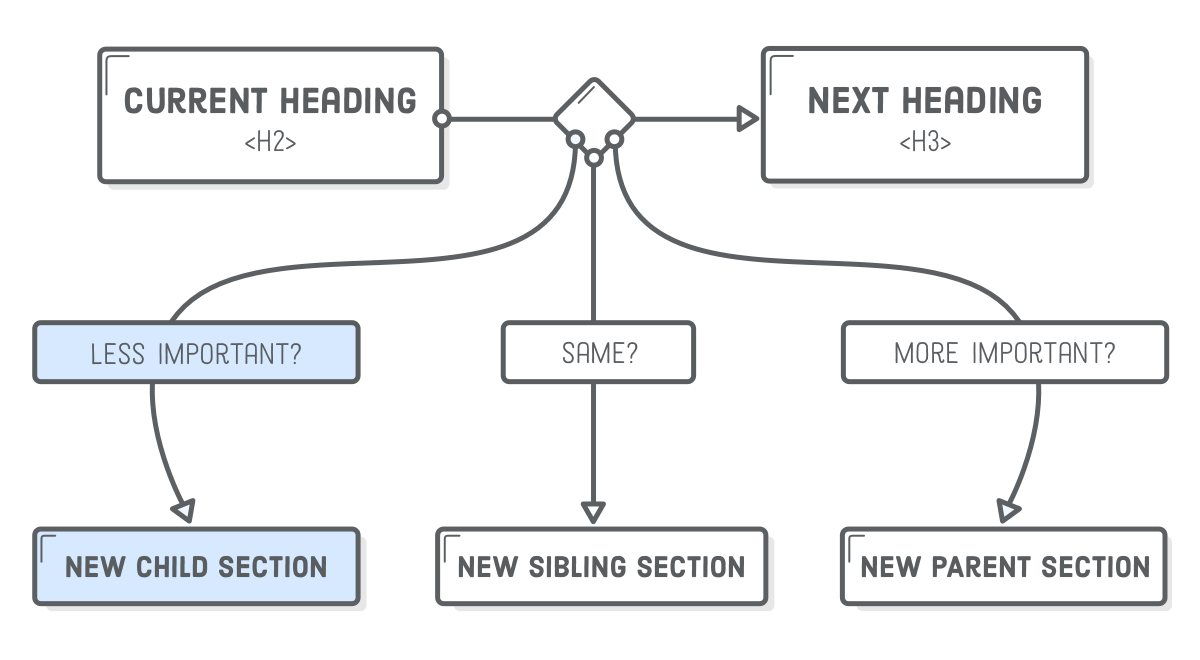
Each <h1> element creates a new section in the document outline, and any less prominent headings that follow it are considered subsections under that top-level heading. E.g., the Semantic HTML section has two subsections in it: The Document Outline and Inline Semantic HTML. The same goes for <h2> and <h3> elements, and so on down to <h6>.
Note that the actual value of the heading level doesn’t matter: what’s important is whether or not it’s greater than or less than the heading of the current section. For example, change the <h3> headings to <h4> and run it through the outliner tool again. Since the <h4> is still less than the parent <h2>, this shouldn’t have any affect on the document outline.
How’s this document outline stuff relate to semantic HTML? Well, headings are some of the most semantic things in a web page. They play a significant role in how search engines determine what’s important in your web page. In addition, the semantic HTML elements we’re about to cover add more meaning to and sometimes even alter the default outlining behavior discussed here.
Articles
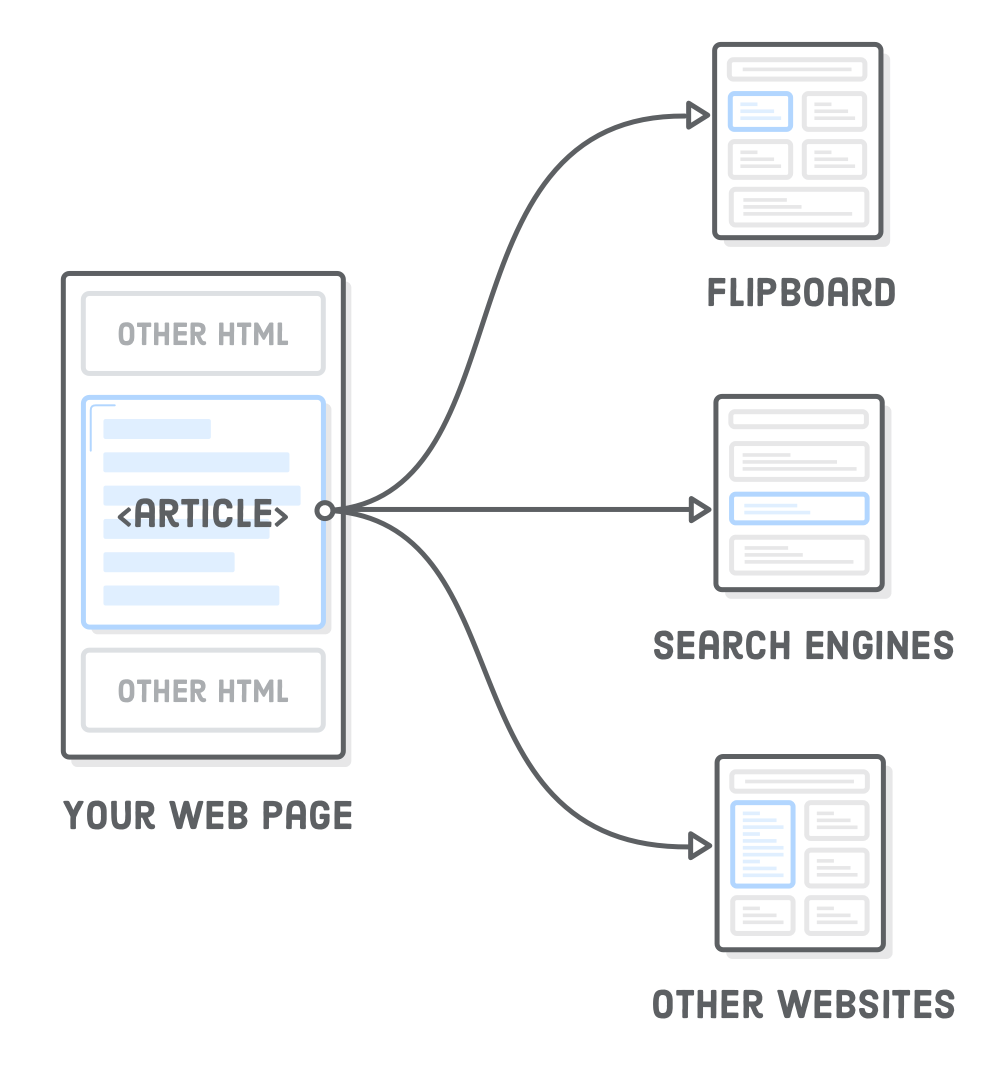
The <article> element represents an independent article in a web page. It should only wrap content that can be plucked out of your page and distributed in a completely different context. For instance, an app like Flipboard should be able to grab an <article> element from your site, display it in its own app, and have it make perfect sense to its readers.
In our example, we can use <article> to mark the main content of the page as a self-contained unit, like so:
Notice how we left the copyright notice outside the <article> element because it’s a footer for the entire site—not specifically for our article. As we’ll discover shortly, <article>’s are essentially mini web pages in your HTML document. They have their own headers, footers, and document outline that are completely isolated from the rest of your site.
Using Multiple Article Elements
For things like blog posts, newspaper articles, or web pages dedicated to a single topic, there’s often only one <article> element on the page. But, it’s perfectly legal to have more than one <article> element per page. A good example is a page that displays a bunch of blog posts. Each one of them can be wrapped in a separate set of <article> tags (you don’t need to add this to our article.html page):
<article><h1>First Post</h1><p>Some content</p></article><article><h1>Second Post</h1><p>Some more content</p><h2>Subsection</h2><p>Some details</p></article><article><h1>Last Post</h1><p>Final bit of content</p></article>
This tells anybody looking at our page that there are three distinct articles that can be syndicated. Think of it as a way to merge multiple HTML files into a single document without confusing search engines, browsers, or other machines that are trying to parse our content.
Compare this to a bunch of generic <div> elements with arbitrary class names, and you can begin to see how semantic HTML makes the Web a much easier place to navigate.
Sections
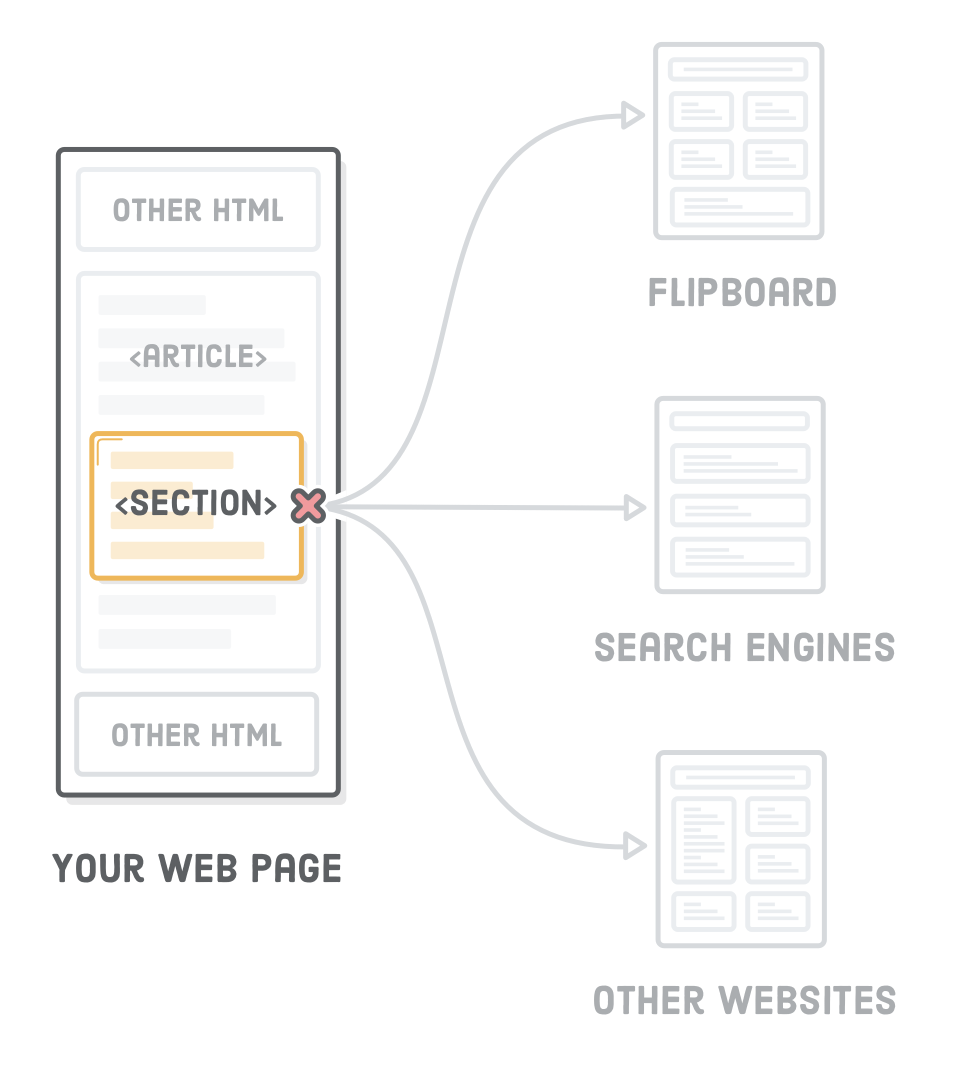
The <section> element is sort of like an <article>, except it doesn’t need to make sense outside the context of the document. That is, an app like Flipboard wouldn’t try to pull out all the <section>’s of your page and present them as independent pieces of content.
Think of <section> as an explicit way to define the sections in a document outline. Why would we want this instead of letting the heading levels do it for us? Often times, you need a container to wrap a section for layout purposes, and it makes sense to use the more descriptive <section> element over a generic <div>.
Let’s section off two parts of our article.html file:
<section><!-- Add this --><h2>The Document Outline</h2><p>HTML5 includes several “sectioning content” elements that
affect the document outline.</p><h3>Headers</h3><p>The <code><header></code> element is one such sectioning
element.</p><h3>Footers</h3><p>And so is the <code><footer></code> element.</p></section><!-- And this --><section><!-- This too! --><h2>Inline Semantic HTML</h2><p>The <code><time></code> element is semantic, but it’s not
sectioning content.</p></section><!-- Don't forget this -->
This keeps our document outline the exact same while lending it some extra semantic structure, as well as a nice hook for any CSS styles we might want to apply (e.g., a background color for a particular section).
<section> and the Document Outline
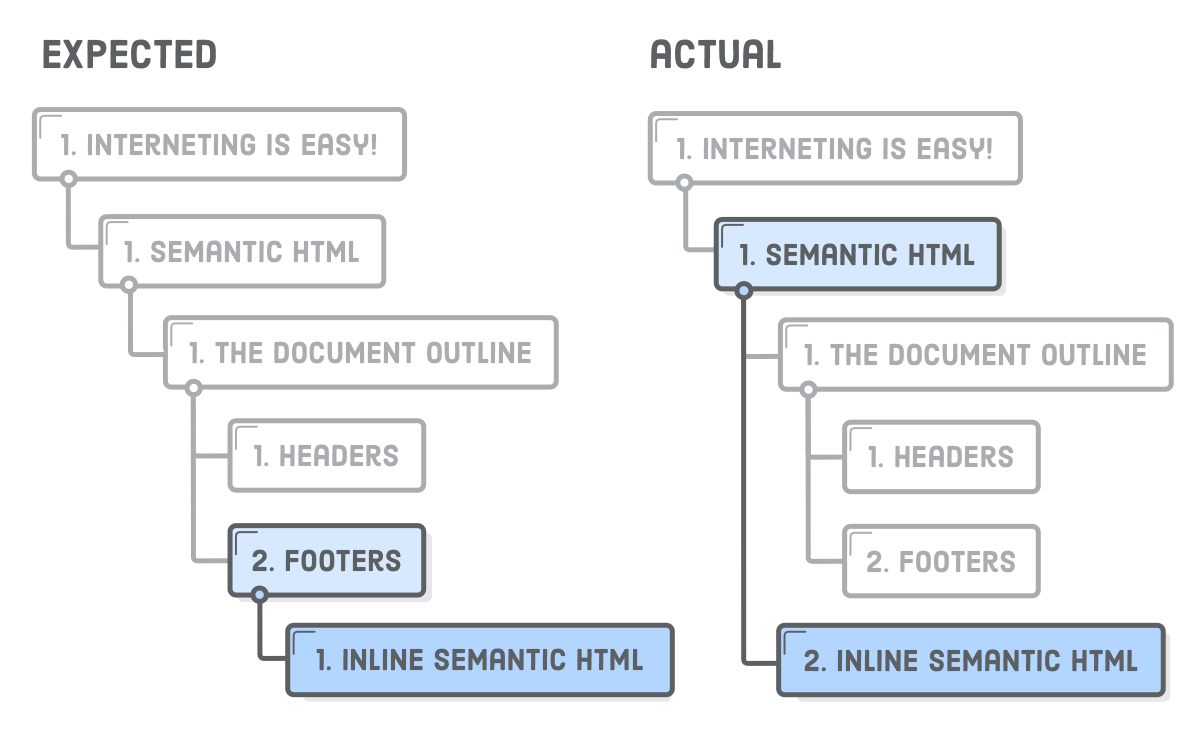
The previous change also has an interesting side effect on the implicit sectioning behavior of our headings. Watch what happens when we bump the second <h2> down to a much lower heading level:
<section><h6>Inline Semantic HTML</h6><!-- Change this heading level --><p>The <code><time></code> element is semantic, but it’s not
sectioning content.</p></section>
The <h6> is lower than the <h3> that precedes it, so you might expect it to become part of the Footer section. But, that’s not the case: the document outline is still the exact same as before.
By adding those <section> elements, we’re telling the document outline that it should be defined by the nesting structure of the <section> elements instead of the heading levels. This basically means that each <section> can have its own set of <h1> through <h6> headings that are independent of the rest of the page.
However, you shouldn’t use the <section> element to manipulate the document outline in this way because browsers, screen readers, and some search engines don’t properly interpret the effect of <section> on the document outline. Instead, always define a page’s outline via heading levels, using <section> only as a replacement for container <div>’s when appropriate.
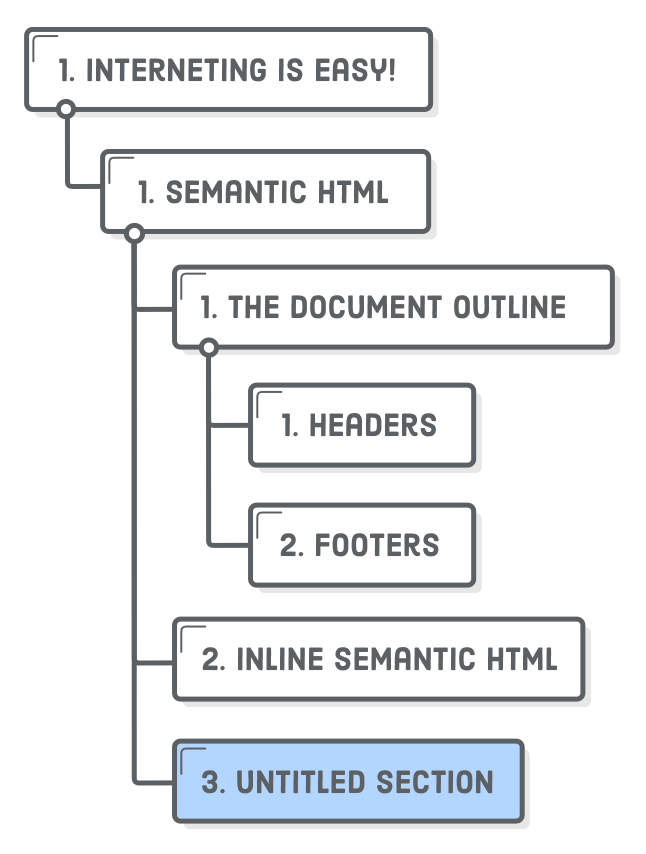
Also note that each <section> element should contain at least one heading, otherwise it will add an “untitled section” to your document outline. As an example, try updating article.html to match the following, then run it through the outliner tool again:
<h2>Inline Semantic HTML</h2><section><!-- This will be an "Untitled Section" --><p>The <code><time></code> element is semantic, but it’s not
sectioning content.</p></section>
This creates a new section, but since there’s no heading associated with it, the document outline doesn’t know what to call it. This should generally be avoided when using <section> elements.
As defined by the HTML5 specification, <section> is a pretty generic element. That, plus the fact that browsers and screen readers can’t properly interpret its role in document outlines makes it difficult to know when and how to leverage it properly. Our advice is to only use <section> as a more descriptive <div> wrapper for the implicitly defined sections of your page. Don’t use it for self-contained content (that’s what <article> is for) or when it’s purely for layout purposes.
Nav Elements
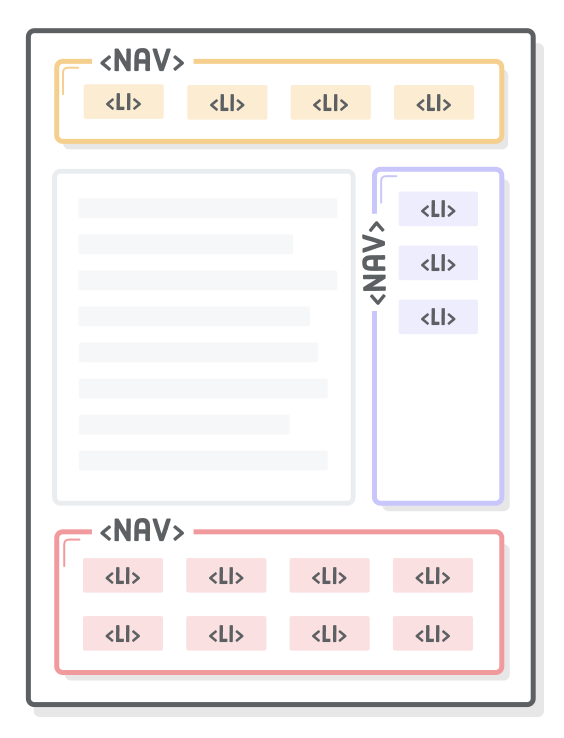
The <nav> element lets you mark up the various navigation sections of your website. This goes for the main site navigation, links to related pages in a sidebar, tables of content, and pretty much any group of links. For example, we should stick our site-wide navigation menu in a <nav> element:
<h1>Interneting Is Easy!</h1><nav><!-- Add this --><ul><li><ahref='#'>Home</a></li><li><ahref='#'>About</a></li><li><ahref='#'>Blog</a></li><li><ahref='#'>Sign Up</a></li></ul></nav><!-- This too! -->
This is a great piece of semantic information for search engines. It helps them quickly identify the structure of your entire website, making it easier to discover other pages. As we’ll see in Asides, it’s possible to include multiple <nav> elements on a single page if you have different sets of related links.
Headers
The <header> element is a new piece of semantic markup, not to be confused with headings (the <h1>-<h6> elements). It denotes introductory content for a section, article, or entire web page. “Introductory content” can be anything from your company’s logo to navigational aids or author information.
It’s a best practice to wrap a website’s name/logo and main navigation in a <header>, so let’s go ahead and add one to our example project:
<header><h1>Interneting Is Easy!</h1><nav><ul><li><ahref='#'>Home</a></li><li><ahref='#'>About</a></li><li><ahref='#'>Blog</a></li><li><ahref='#'>Sign Up</a></li></ul></nav></header>
Headers are only associated with the nearest sectioning element—typically a <body>, <section>, or <article> element. This means that you can use multiple <header> elements to add introductory content to different parts of a document. For instance, the title, author, and publication date of our <article> is a pretty good candidate for another <header>:
<article><header><h1>Semantic HTML</h1><p>By Troy McClure. Published January 3rd</p></header><p>This is an example web page explaining HTML5 semantic markup.</p><!-- ... -->
Without this <header>, search engines and screen readers wouldn’t know that first <p> was separate from the main content of the article. Like <section>, it also serves as a convenient CSS hook, since the title and author info for a blog post are often styled differently than the rest of the article. Again, think of <header> as a more semantic alternative to a <div> container.
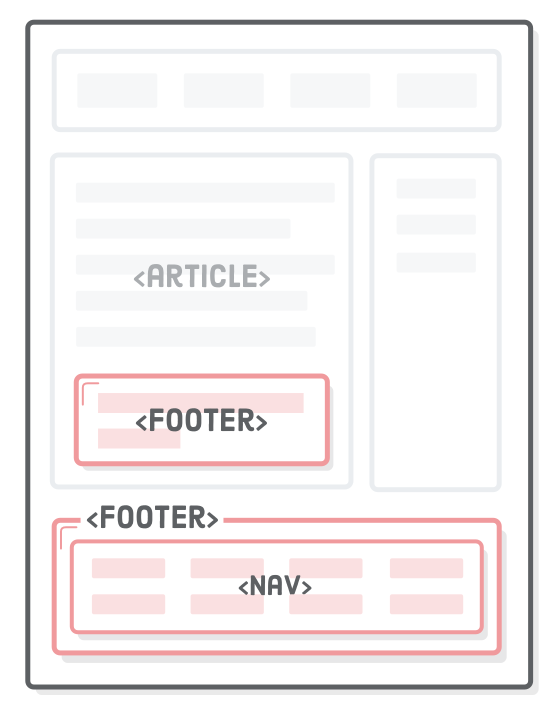
Footers
Conceptually, footers are basically the same as headers, except they generally come at end of an article/website opposed to the beginning. Common use cases include things like copyright notices, footer navigation, and author bios at the end of blog posts.
Footers behave the same as <header> in that they’re associated with the nearest sectioning element. So, we can use it for our page’s copyright notice and the author information inside our <article>. Add the following two footer elements to our article.html page:
The <footer> inside the <article> element is only for the contents of that article, which makes sense because it contains the author’s bio. The second footer, on the other hand, is connected to the entire page.
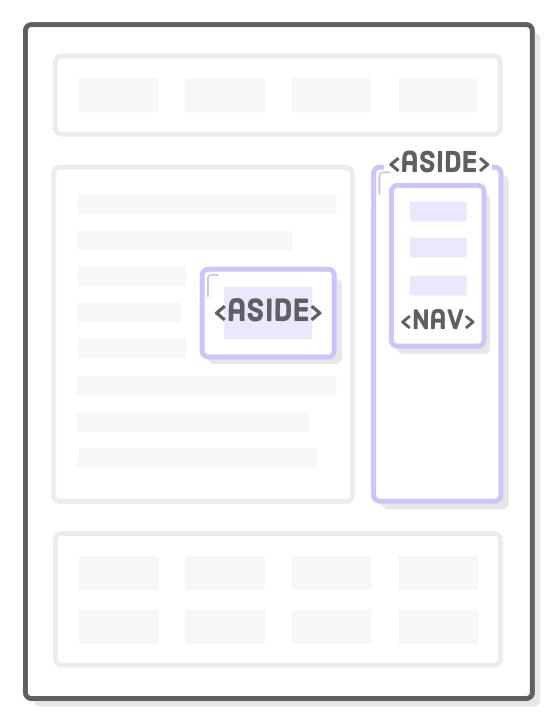
Asides
Headers and footers are ways to add extra information to an article, but sometimes we want to remove information from an article. For example, a sponsored blog post might contain an advertisement about the sponsoring company; however, we probably don’t want to make it part of the article text. This is what the <aside> element is for.
Let’s add a fake advertisement to our article.html file, right underneath the article’s header:
<article><header><h1>Semantic HTML</h1><p>By Troy McClure. Published January 3rd</p></header><!-- Look! A fake advertisement! --><asideclass='advert'><imgsrc='some-advert-image.png'/></aside><p>This is an example web page explaining HTML5 semantic markup.</p>
Even though the image is inside the <article> element, machine readers know that it’s only tangentially related to the article content. In addition to advertisements, <aside> is also appropriate for highlighting definitions, stats, or quotations. If it looks different than the rest of the article, chances are it’s an aside.
When used outside an <article>, an <aside> is associated with the page as a whole (much like <header> and <footer>). This makes it a good choice for marking up a site-wide sidebar. Add the following underneath the closing </article> tag, before the second <footer>:
<asideclass='sidebar'><h2>Sidebar</h2><p>Some sidebar content</p><nav><h3>HTML & CSS Tutorial</h3><ul><li><ahref='#'>Introduction</a></li><li><ahref='#'>Basic Web Pages</a></li><li><ahref='#'>etc...</a></li></ul></nav><nav><h3>JavaScript Tutorial</h3><ul><li><ahref='#'>Introduction</a></li><li><ahref='#'>Hello, JavaScript</a></li><li><ahref='#'>etc...</a></li></ul></nav></aside>
Notice the class attributes in both of these snippets. If we were worried about CSS this chapter, we could style our <aside> elements in exactly the same way as all the <div>’s we’ve been working with throughout this tutorial. Which brings us to…
Divs For Layout
You should use semantic HTML whenever you can, since it helps machines infer the structure of your content, and it gives you a standardized vocabulary to organize your web pages. However, sometimes you need a container element when none of the semantic HTML elements we just covered would make sense. There’s nothing wrong with using a plain old <div> purely for layout purposes.
For instance, if we want to center our page using that familiar auto-margin technique, we have to wrap the whole page in a container. It’s entirely presentational, so a <div> is the best option:
This is particularly relevant for flexbox, as it requires lots of <div>’s to group flex items correctly. Occasionally, you may find that a <section> or <nav> is appropriate for these flex items, but it’s pretty common to find a bunch of presentational <div> elements in a flexbox layout.
The point is, don’t use semantic elements just for the sake of using them. Implementing them incorrectly is worse than not using them at all, so if you’re ever in doubt, use a <div> instead.
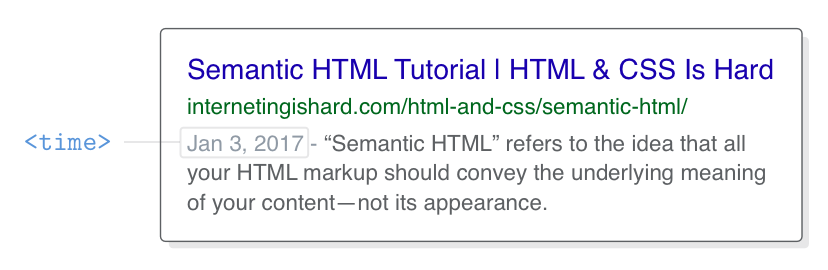
Dates and Times
For humans, dates and times come in many forms. You can refer to January 3rd, 2017 as “1/3/2017”, “Jan 3rd”, or even “yesterday” depending on the current date. Parsing this kind of ambiguous natural language is difficult and error-prone for machines, which is where <time> comes in.
The <time> element represents either a time of day or a calendar date. Providing a machine-readable date makes it possible for browsers to automatically link it to users’ calendars and helps search engines clearly identify specific dates. A simple Google search will show you the effect of including a <time> element on your page:
Let’s make the publish date of our article unambiguous by wrapping it in <time> tags:
<article><header><h1>Semantic HTML</h1><p>By Troy McClure. Published <timedatetime='2017-1-3'>January
3rd</time></p></header><!-- ... -->
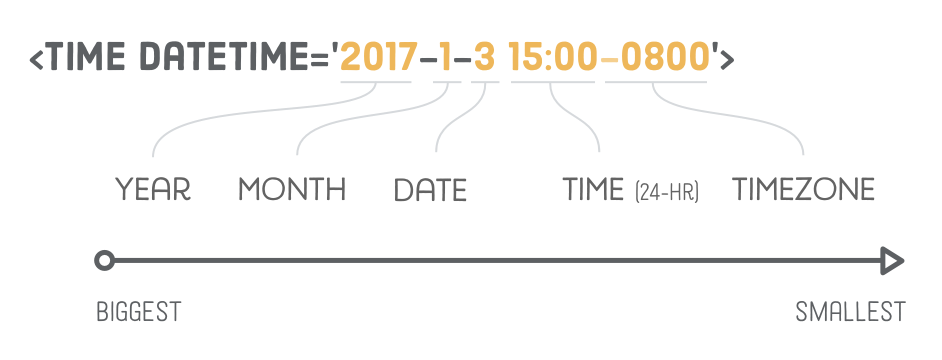
The machine-readable date is defined in the datetime attribute. An easy way to remember the date format is that it goes from largest time period to smallest: year, month, then date. Note that even though the year isn’t included in the human-readable text, this tells search engines that our article was published in 2017.
It’s possible to include times and time zones inside of datetime, too. If we wanted to add a 3:00pm PST time to our publish date, we’d use the following:
The time itself is in 24-hour format, and the -0800 is the time zone offset from GMT (in this case, -0800 represents Pacific Standard Time).
Address
The <address> element is like <time> in that it doesn’t deal with the overall structure of a document, but rather embellishes the parent <article> or <body> element with some metadata. It defines contact information for the author of the article or web page in question. <address> should not be used for arbitrary physical addresses.
For instance, maybe we want to add an author email address in our article’s footer:
<footer><p>This fake article was written by somebody at InternetingIsHard.com, which
is a pretty decent place to learn how to become a web developer. This footer
is only for the containing <code><article></code> element.</p><address>
Please contact <ahref='mailto:troymcclure@example.com'>Troy
McClure</a> for questions about this article.
</address></footer>
By default, this will be styled the same way as <em>, but you can change that with a simple CSS rule. Also notice the new email link in the href, which you can read more about at Mozilla Developer Network.
Figures and Captions
Last, but certainly not least, are the <figure> and <figcaption> elements. The former represents a self-contained “figure”, like a diagram, illustration, or even a code snippet. The latter is optional, and it associates a caption with its parent <figure> element.
A common use case for both of these is to add visible descriptions to the <img/> elements in an article, like so:
<section><h2>The Document Outline</h2><p>HTML5 includes several “sectioning content” elements that
affect the document outline.</p><figure><imgsrc='semantic-elements.png'alt='Diagram showing <article>, <section>, and <nav> elements'/><figcaption>New HTML5 semantic elements</figcaption></figure><!-- ... -->
The alt attribute is closely related to the <figcaption> element. alt should serve as a text replacement for the image, while <figcaption> is a supporting description displayed with either the image or its text-based equivalent.
When using <figcaption> in the above manner, you can safely omit an image’s alt attribute without hurting your SEO. Depending on what kind of images you’re working with, it may be more convenient (and less redundant) to have visible <figcaption>’s that describe them opposed to invisible alt attributes.
CSS/Legacy Considerations
And finally, a quick note on legacy browsers. The semantic HTML elements in this chapter were introduced in HTML5. All modern browser recognize them without any extra work, but you’ll often see something like the following in global CSS stylesheets:
section, article, aside, footer, header, nav {
  display: block;
}
This makes the new semantic elements behave like <div> elements (which are block boxes, not inline boxes) in legacy browsers.
Summary
Defining graphical styles with CSS is how we convey the structure of a web page to humans. By marking it up with <header>, <article>, <figure>, and other HTML sectioning elements, we’re able to represent those visual styles to machines, as well.
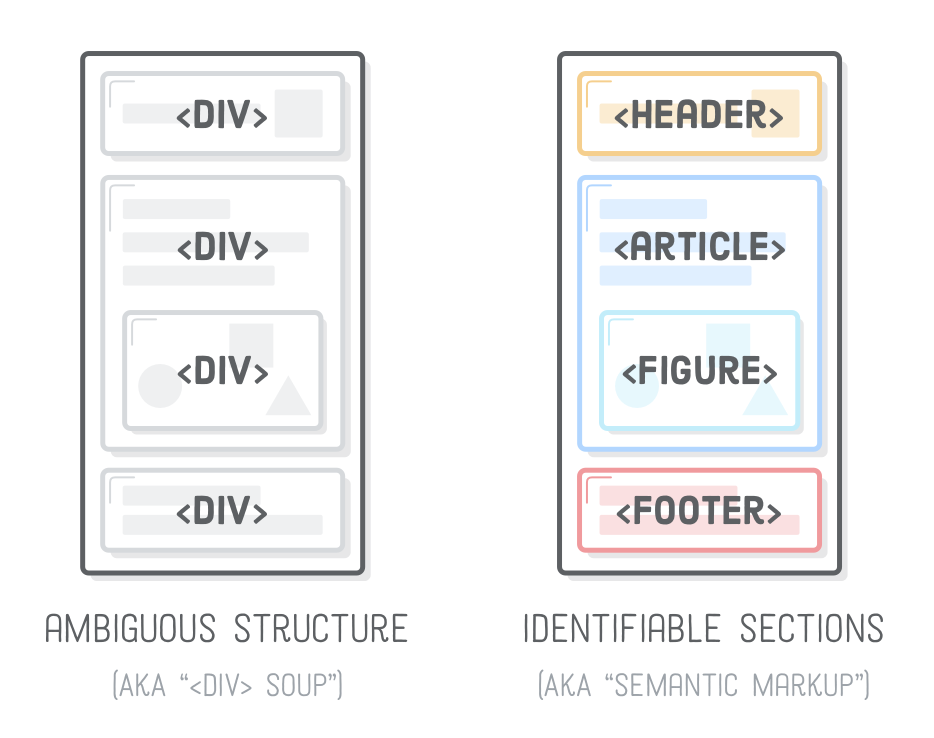
To understand why this is important, we really have to empathize with the machines reading our content. Before semantic HTML was a thing, developers used a bunch of <div>’s with different and somewhat arbitrary class names to define the structure of their pages. For example, all of the following elements are logical names for a site-wide header:
Machine readers used to have to make sense of all the above <div>’s and more. The new semantic HTML elements we learned in this chapter are like standardized versions of these class names. Now, they can simply look for a <header> element. We can still add whatever class name we want to it for styling purposes, but search engines and screen readers now have a predictable way to identify headers across every HTML5 website on the Internet.
The semantic elements we covered in this chapter are best practices for modern websites, but keep in mind that they hardly scratch the surface when it comes to extra meaning you can add to your web pages. Just for starters:
Schema.org microdata lets you alter the appearance of your site in search engine results.
Twitter cards define how your web page is displayed in tweets.
This kind of stuff is closer to the realm of technical SEO, so we’ll leave you to explore it on your own. In the next chapter, we’ll switch gears again and introduce another critical component of websites (especially e-commerce ones): forms.